Inleiding
If you’ve ever deployed a Laravel app in production, you’ve probably run into this frustrating issue:
alles werkt perfect tijdens ontwikkeling, maar zodra je je SSH-sessie sluit of de server herstart, stopt je queue:work proces.
En wanneer dat gebeurt, stoppen achtergrondtaken — zoals het versturen van e-mails, importeren van bestanden of verwerken van betalingen — plotseling.
That’s where Supervisor comes in.
Supervisor is a battle-tested process control system that ensures your Laravel queues keep running 24/7, even after reboots, crashes, or code updates. It’s one of those small, behind-the-scenes tools that separates a hobby project from a production-grade application.
In this 2025 step-by-step guide, you’ll learn exactly how to:
- Install and configure Supervisor on Amazon Linux 2023 (EC2)
- Set up Laravel to manage Redis queue workers automatically
- Keep jobs running after code deploys or server reboots
- Use systemd for stable startup and automatic recovery
- Add logging, scaling, and security optimizations for production
Let’s build a bulletproof queue system that never quits.
1. Why Laravel Redis Queues Need Supervisor
Laravel’s queue system is brilliant—it lets you offload heavy or time-consuming tasks to a background process. Whether you’re sending hundreds of emails, syncing large data sets, or processing imported files, queues keep your app fast and responsive.
But there’s a problem: The command you use to run queues—
php artisan queue:work
— draait alleen zolang je terminalsessie open is. Zodra je je SSH-verbinding sluit of nieuwe code deployt, stopt die worker.
In production, that’s unacceptable. You can’t afford your jobs to silently stop.
Maak Kennis met Supervisor
Supervisor is een lichtgewicht procesmanager geschreven in Python. Het:
- Bewaakt en herstart queue workers automatisch
- Zorgt ervoor dat ze starten bij het opstarten
- Houdt logs bij van worker-activiteit en fouten
- Laat je eenvoudig meerdere worker-processen schalen
- Provides simple control via
supervisorctl
When configured properly, Supervisor gives you peace of mind—your Redis queues will always run in the background, even if you never log into the server again.
2. Vereisten
Before diving in, make sure you have:
- Amazon Linux 2023 (EC2 instance)
- PHP 8.2+ and Composer installed
- Redis and
phpredisorpredisextension - A working Laravel 10 or 11 application
- SSH access as
ec2-userwithsudoprivileges
And confirm that your .env is correctly set up for Redis:
QUEUE_CONNECTION=redis
CACHE_DRIVER=redis
SESSION_DRIVER=redis
Once these are ready, let’s install Supervisor.
3. Supervisor Installeren op Amazon Linux 2023
Unlike Ubuntu, Amazon Linux 2023 doesn’t include Supervisor in its default repositories.
We’ll install it manually using Python’s package manager (pip3).
Stap 1: pip en Supervisor Installeren
sudo dnf install -y python3-pip
sudo pip3 install supervisor
Stap 2: Supervisor Mappen Aanmaken
sudo mkdir -p /etc/supervisor/conf.d
sudo echo_supervisord_conf | sudo tee /etc/supervisord.conf > /dev/null
Stap 3: Extra Configuratiebestanden Opnemen
Open het hoofdconfiguratiebestand:
sudo nano /etc/supervisord.conf
Voeg onderaan toe:
[include]
files = /etc/supervisor/conf.d/*.conf
Sla op en sluit af (Ctrl + O, Enter, Ctrl + X).
4. Supervisor Configureren met systemd
To make sure Supervisor starts automatically when your EC2 instance boots, we’ll wire it to systemd.
Stap 1: Het systemd Unit Bestand Aanmaken
sudo tee /etc/systemd/system/supervisord.service > /dev/null <<'SERVICE'
[Unit]
Description=Supervisor daemon
After=network.target

[Service]
ExecStart=/usr/local/bin/supervisord -n -c /etc/supervisord.conf
ExecStop=/usr/local/bin/supervisorctl shutdown
ExecReload=/usr/local/bin/supervisorctl reload
Restart=always
User=root

[Install]
WantedBy=multi-user.target
SERVICE
Stap 2: Supervisor Inschakelen en Starten
sudo systemctl daemon-reload
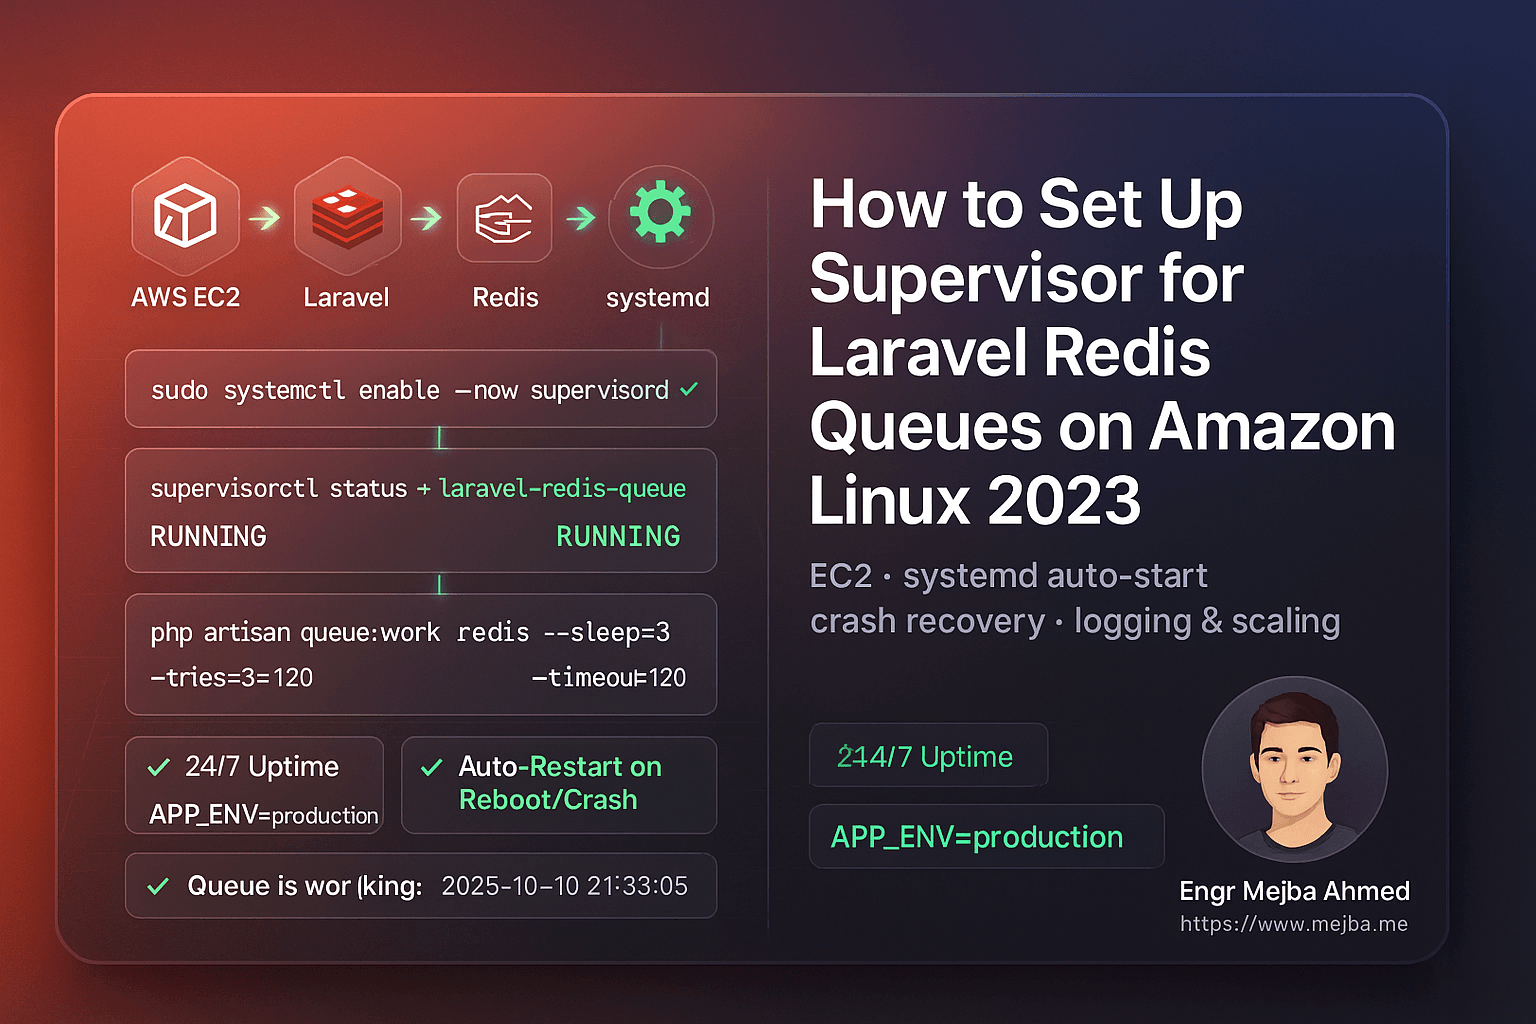
sudo systemctl enable --now supervisord
sudo systemctl status supervisord
Je zou moeten zien:
Active: active (running)
Nu start Supervisor automatisch elke keer dat je server herstart.
5. Laravel Queue Workers Instellen
We’ll configure Supervisor to manage your Laravel queue workers.
Stap 1: Je PHP Pad Vinden
which php
You’ll likely get /usr/bin/php.
Gebruik dat pad in je configuratiebestand.
Stap 2: Je Worker Configuratie Aanmaken
sudo tee /etc/supervisor/conf.d/laravel-redis-queues.conf > /dev/null <<'CONF'
[program:laravel-redis-queue]
directory=/var/www/writeflow-ai
command=/usr/bin/php artisan queue:work redis --sleep=3 --tries=3 --timeout=120 --backoff=3 --verbose
autostart=true
autorestart=true
user=ec2-user
redirect_stderr=true
stdout_logfile=/var/www/writeflow-ai/storage/logs/queue-worker.log
stdout_logfile_maxbytes=20MB
stdout_logfile_backups=5
environment=APP_ENV="production",HOME="/home/ec2-user",PATH="/usr/local/bin:/usr/bin:/bin"
CONF
Stap 3: Supervisor Herladen
sudo /usr/local/bin/supervisorctl reread
sudo /usr/local/bin/supervisorctl update
sudo /usr/local/bin/supervisorctl status
If everything’s configured correctly, you’ll see:
laravel-redis-queue RUNNING pid 1234, uptime 0:00:03
6. Je Queue Setup Testen
Let’s make sure your queues actually run.
Stap 1: Een Test Job Aanmaken
php artisan make:job TestQueueJob
Open app/Jobs/TestQueueJob.php en wijzig de handle() methode:
public function handle()
{
    \Log::info('✅ Queue is working fine: '.now());
}
Stap 2: Verstuur Het
php artisan tinker --execute="App\\Jobs\\TestQueueJob::dispatch();"
Stap 3: Controleer de Logs
tail -f storage/logs/laravel.log
Je zou moeten zien:
[2025-10-10 21:33:05] production.INFO: ✅ Queue is working fine: 2025-10-10 21:33:05
Gefeliciteerd — je Laravel Redis queue is nu volledig onder supervisie en productieklaar.
7. Workers Automatisch Herstarten Na Code Deploys
Telkens wanneer je nieuwe code deployt of je .env bestand wijzigt, moet je je queue workers herstarten om de laatste wijzigingen te laden.
In plaats van lange commando's uit te voeren, maak een hulpscript:
sudo tee /usr/local/bin/restart-workers.sh >/dev/null <<'SH'
#!/bin/bash
echo "🔄 Restarting Laravel queue workers..."
/usr/local/bin/supervisorctl reread
/usr/local/bin/supervisorctl update
/usr/local/bin/supervisorctl restart all
echo "✅ All workers restarted successfully."
SH

sudo chmod +x /usr/local/bin/restart-workers.sh
Na elke deployment, voer je gewoon uit:
sudo /usr/local/bin/restart-workers.sh
Eenvoudig, schoon en veilig.
8. Houd Logs Beheersbaar met Log Rotatie
Supervisor maakt aparte logbestanden aan voor elke worker. Na verloop van tijd kunnen deze groot worden. Je kunt opruiming automatiseren met logrotate.
sudo tee /etc/logrotate.d/laravel-supervisor >/dev/null <<'ROT'
/var/www/writeflow-ai/storage/logs/queue-worker.log {
  weekly
  rotate 5
  missingok
  notifempty
  copytruncate
  compress
}
ROT
Dit roteert logs wekelijks, bewaart 5 back-ups en comprimeert oude bestanden.
9. Queue Workers Schalen
Meer verkeer of achtergrondtaken die zich opstapelen? Schaal eenvoudig.
Bewerk je Supervisor configuratie:
[program:laravel-redis-queue]
numprocs=2
process_name=%(program_name)s_%(process_num)02d
Dan:
sudo /usr/local/bin/supervisorctl reread
sudo /usr/local/bin/supervisorctl update
sudo /usr/local/bin/supervisorctl status
Now you’ll have two concurrent workers processing jobs simultaneously.
10. Alles Verifiëren Na een Herstart
Herstart je EC2 instance om het automatisch startgedrag te bevestigen:
sudo reboot
Zodra de instance weer online is:
sudo /usr/local/bin/supervisorctl status
Je queue zou automatisch moeten draaien — zonder dat je iets hoeft aan te raken.
11. Veelvoorkomende Fouten & Oplossingen
| Probleem | Oorzaak | Oplossing |
|---|---|---|
BACKOFF of FATAL |
Verkeerd PHP pad | Voer which php uit en update config |
Permission denied |
Wrong file owner | sudo chown -R ec2-user:ec2-user storage |
queue:work not processing |
Redis not running or wrong env vars | sudo systemctl restart redis |
| No logs | Wrong log file path | Check stdout_logfile in config |
Jobs stuck in failed_jobs |
Exceptions or timeout too short | Increase --timeout or inspect logs |
Quick Takeaways
✅ Use Supervisor to ensure your Laravel queues run continuously.
✅ Install via pip3 on Amazon Linux 2023 (not yum).
✅ Link Supervisor to systemd so it auto-starts on reboot.
✅ Add a restart script for clean deployments.
✅ Implement log rotation to prevent storage bloat.
✅ Scale workers easily with numprocs.
✅ Test with a sample job to confirm everything works.
Conclusie
When it comes to Laravel queue reliability, Supervisor is non-negotiable. Without it, your background jobs can silently stop, leading to failed emails, unprocessed tasks, or delayed user experiences.
By setting up Supervisor on Amazon Linux 2023, you’ve built a robust, self-healing background process system powered by Redis and systemd.
Your queues now:
- Run automatically after deploys or reboots
- Restart on crashes
- Scale seamlessly
- Log every event
That’s the kind of stability every serious Laravel application deserves.
Call to Action
If this guide helped, share it with your DevOps or Laravel team.
Need expert help right now?
- ✅ Hire me on Fiverr: Laravel/AWS Optimization & DevOps
- 🏢 Or work with our team at Ramlit Limited for enterprise-grade Laravel, AI, and cloud solutions.
Let’s make your queues bulletproof and your deployments effortless.
FAQs
1. Why use Supervisor instead of a cron job?
Because cron runs on fixed intervals, not continuously. Supervisor monitors queue:work in real-time and restarts it instantly on crash or reboot.
2. Can I use this setup for SQS or Database queues?
Absolutely. Just replace redis in the command with your queue driver (e.g., database or sqs).
3. How do I stop all queue workers?
Run:
sudo /usr/local/bin/supervisorctl stop all
4. Wat gebeurt er als ik nieuwe code deploy zonder workers te herstarten?
They’ll keep running old code in memory. Always run supervisorctl restart all after a deploy.
5. Is deze setup veilig voor productie?
Yes. It’s clean, secure, and aligned with modern Amazon Linux 2023 practices.
Slotwoord: Je Laravel Redis queues zijn nu onstopbaar. Geen downtime meer. Geen handmatige herstarts meer. Gewoon pure, productieklare prestaties — aangedreven door Supervisor.