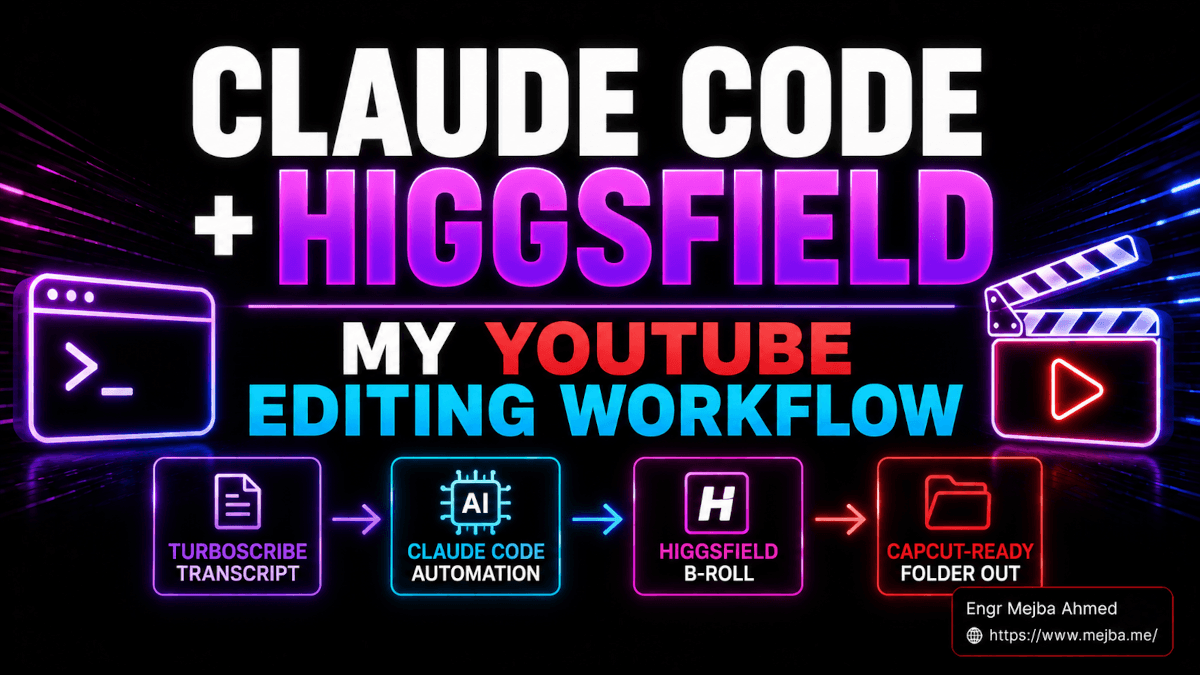
Claude Code Higgsfield Video Workflow for YouTube
I used to dread the editing day. Not the cutting — the cutting I can do in my sleep. The part I dreaded was the b-roll. Forty minutes of talking-head footage on my screen, a timeline waiting for visuals every fifteen seconds, and the slow, soul-leaching realization that I was about to spend the next three hours scrubbing through stock libraries hunting for one shot of "hands typing on a laptop" that did not look exactly like the one I had used in the last six videos. I built a Claude Code Higgsfield video workflow specifically because that day was eating my Wednesdays alive, and the solution turned out to be simpler — and stranger — than I expected.
Here is the punchline I want you to hold onto for the next four thousand words: the secret is not better AI image generation. The secret is the timestamp. Once your audio has a timestamped transcript, a filename becomes a placement map. An image named 00:01:34.png does not just describe a moment — it tells your editor exactly where on the timeline to drop the file. The whole workflow collapses into "generate the right images with the right filenames, drag the folder into CapCut, walk away." That is the unlock. Everything else is plumbing.
I am going to walk through the full pipeline I now run for every long-form video — Claude Code as the orchestrator, the Higgsfield skill bundle for the actual image generation, TurboScribe for the timestamped transcript, and CapCut for the assembly. I will give you the exact master prompt I paste in, the four style words I cycle through, the cost math for a typical thirty-minute video, and the very specific way TurboScribe can betray you if you click the wrong export button. By the end of this you will be able to install the stack tonight and ship a video on Saturday that would have eaten your whole weekend before.
The Three-Hour B-Roll Problem Nobody Wants to Talk About
I have made a lot of YouTube videos. I am one of those people who likes to be honest about where the hours actually go in a creator workflow, because I have watched too many tutorials that fold the painful parts of the process behind a smash cut to "and here is the final result." So here is the real distribution of my time on a thirty-minute talking-head video before this workflow existed.
Recording: forty to ninety minutes, depending on whether I got the cold open right. Editing the spoken cut down: roughly an hour. Color, audio cleanup, captions: another hour. B-roll hunting and placement: three to five hours. Thumbnail and title iteration: thirty minutes. End screen and uploads: fifteen minutes.
Notice which category is the longest. It is not even close. The b-roll line is doing more damage to my Wednesdays than every other line item combined, and the reason is structural. B-roll is a search problem disguised as a creative problem. You know roughly what you want at each beat — "something visual that says 'cost math' here" — but executing that decision means opening a stock library, typing a query, scrubbing previews, picking a clip, downloading it, dragging it in, trimming, and then realizing the colors do not match the previous shot. Multiply by sixty visual cuts in a thirty-minute video and you have lost the afternoon.
The first thing I tried was AI-generated b-roll directly inside an editor. There are plug-ins for that now. They are fine. They are also slow, expensive per shot, and disconnected from your transcript — you still have to manually decide what visual goes where, which is the most time-consuming part of the whole thing. I want to be clear about that, because plenty of "AI video b-roll" pitches are still solving the wrong half of the problem. The generation is not the bottleneck. The placement decision is the bottleneck. And placement is solved the moment a timestamp becomes a filename.
That insight is the one I want you to take with you even if you ignore the rest of this post.
Why a Timestamped Filename Changes the Math
Stop and think about what a video editor actually does when you drop a folder of images into a project. CapCut, Premiere, DaVinci Resolve, every modern editor — they import the files and sort them alphabetically by default. Filenames that start with 00:00:14, 00:00:31, 00:01:02, 00:01:47 sort themselves into chronological order automatically. If those timestamps correspond to moments in your audio, the sort order is also the timeline order. You do not need to manually place anything. You drag the folder onto the timeline, the images land in sequence, and a quick snap-to-audio aligns each one with the moment it was meant for.
The whole workflow lives or dies on that detail. If your transcript has timestamps and your image generator preserves those timestamps as filenames, you have a placement map. If either piece breaks, you are back to manually deciding where every image goes — which means you might as well not have automated the generation at all.
This is exactly why TurboScribe sits in the middle of this stack. TurboScribe gives you sentence-level timestamps in a format you can copy directly into a prompt. It is not the only tool that does this — Whisper does, Descript does, plenty of others do — but TurboScribe is the one I keep going back to because the output format is the cleanest to paste into Claude Code, and because the free tier holds up surprisingly well at the volume most independent creators are operating at. More on that pricing math in a few sections, because it matters.
The other half of the equation is Claude Code itself. The agent is the only piece of the stack that can do all four things in one session: read a long transcript, decide what image to generate at each timestamp, call Higgsfield to actually generate it, and name the output file with the timestamp. No other tool in the pipeline can do all four. That is why the orchestration layer matters as much as the generation layer.
The Stack: What Each Layer Owns
Before the install walkthrough, here is the full picture so you can see how the pieces fit. I will explain each one in detail in the sections after this.
Claude Code is the brain. It runs locally on my Mac as the desktop app, holds the transcript in context, picks a visual concept for each timestamp, builds the prompt for Higgsfield, calls the skill, names the output file, and saves the whole batch into a folder. If you have never installed Claude Code before, the desktop app is the easiest entry point in 2026 — sign in with your Anthropic account and the agent is live.
Higgsfield is the image generator. Higgsfield aggregates more than thirty image and video models under one subscription — Soul 2.0 for avatars, then Sora 2 and Veo 3.1 for motion, alongside Kling 3.0, Seedance 2.0, plus Nano Banana 2 and Flux 2 on the image side, GPT Image 2, and many more — and exposes them through a Claude Code skill bundle. The skill bundle is the piece that matters here. Once installed, "generate an image" becomes a CLI command Claude Code can call inline. I wrote about the broader Higgsfield CLI install in my Higgsfield CLI Claude Code build log and about the MCP-flavored install in my content operating system breakdown, but for this workflow I use the skill bundle specifically.
TurboScribe is the transcript layer. Upload your audio file (not a script — your actual recorded audio), wait two or three minutes, and get back a fully timestamped transcript you can copy out of the browser. Free tier covers three files per day at thirty minutes each. Paid tier is twenty dollars a month or ten dollars a month annually for unlimited length and volume. I will explain in a section below which one you actually need based on your output cadence.
CapCut is the assembly. Drop the generated folder onto the timeline, the filenames sort the images into chronological order, snap to the audio waveform, and your visuals are aligned with the moments they were generated for. Optional overlays, masks, paper textures, and blending modes go on top.
That is the whole stack. Four tools. One is your brain. One is your image engine. One is your transcript layer. One is your editor. Nothing custom. Nothing exotic. Every piece is something a beginner can install today.
Installing Claude Code and the Higgsfield Skill
I want to walk through the install in detail because most write-ups gloss over the one decision that actually matters — and that is the install scope. Get this wrong and you will be re-installing the skill in every project folder for the rest of your life.
Step one: Claude Code. Download the desktop app from Anthropic, sign in with your Claude account, and confirm the agent is running. If you prefer the CLI version inside a terminal, that works too — both routes hit the same agent runtime. New installs in 2026 default to the desktop app because it is the friendlier entry point, but the skills system works identically across both.
Step two: a Higgsfield account. Sign up at higgsfield.ai. The platform's 2026 plans run from a Starter tier at fifteen dollars to an Ultra tier at eighty-four dollars per month, with credit packs available for burst generation. For a single thirty-minute video, you will burn somewhere between forty and one hundred credits depending on how many visual beats you generate. The Starter plan is more than enough to test the workflow end to end.
Step three: the skill install. This is the moment where the workflow actually wires up. In any terminal — VS Code, Cursor, Ghostty, the macOS Terminal app, whatever you have — run the following command:
npx skills add higgsfield-ai/skills -a claude-code -g
That npx skills invocation is the Vercel Labs skills CLI. It fetches the official Higgsfield skill bundle from GitHub, copies it into your Claude Code skills directory, and registers it with the agent. The -a claude-code flag binds the skills to Claude Code as the runtime. The -g flag installs globally rather than per-project. Pick global. The whole point of a creative skill like this is to have it available in any project folder you happen to be in tonight at midnight, not buried inside one repository.
The installer will ask a couple of follow-up questions. One is the symlink question. By default, the Vercel Labs CLI installs skills into ~/.agents/skills/ and creates a symlink from ~/.claude/skills/ pointing at the same files. The symlink is what makes the skill discoverable to Claude Code without duplicating files across every agent you might use. Always say yes to the symlink. If you skip it, the skill will install but Claude Code will not find it on launch, which is exactly the kind of error that costs you an hour of debugging before you realize the symlink is the issue.
The other question is which sub-skills to enable. The Higgsfield bundle ships with about a dozen of them — image generation, video generation, product photoshoot, marketing studio, Soul ID for identity-locked characters, and a few others. For the b-roll workflow, the only one you strictly need is the general-purpose image generation skill. I install all of them because each one adds a few CLI commands and the storage cost is trivial, but if you are space-conscious or skill-overload-conscious, just the image generator is fine.
Total install time on a clean machine: about ninety seconds, most of which is npm pulling dependencies.
Verifying the Install Without Wasting Credits
After the install completes, do not immediately fire off a hundred-image batch. Burn one image as a smoke test first. This is the part most tutorials skip and it is the single most boring habit that will save you from publishing a video where half the b-roll came back broken.
Open Claude Code and ask, in plain language:
Is Higgsfield installed and ready? Generate a single 16:9 test image — Earth from space, photorealistic — and save it to
./test-output/.
If the install is correct, Claude Code will recognize the Higgsfield skill, route the prompt to the appropriate model, generate the image, and save it to the folder. The whole round trip takes about thirty to ninety seconds depending on which model the skill chose. Open the file. Confirm it actually looks like Earth from space and not a corrupted PNG.
If something goes wrong, the failure mode is usually one of three things. Either the skill is not in the right directory (check ~/.claude/skills/ and look for higgsfield-generate or similar), or your Higgsfield account is out of credits (check the dashboard), or the symlink question got skipped during install (re-run the installer and say yes this time). Each of these is a thirty-second fix once you know which one it is.
Why does this verification step matter? Because the master prompt you are about to send is going to ask Claude Code to generate forty to one hundred images in a single batch. If the skill is misconfigured, you will not find out from one failed image — you will find out from forty failed images, with no clear log of which prompt produced which broken output. Smoke test first. Always.
The TurboScribe Step Where Most People Lose Their Timestamps
This is the part where I want to plant a warning flag, because I have watched two friends shoot themselves in the foot on the exact same step and I do not want it to happen to you.
Upload your recorded audio to TurboScribe — not your written script, your actual voice recording. The whole point of timestamps is to map them to spoken moments, which means the source has to be audio. If you upload a script, the timestamps will be relative to the script, which means nothing once you open the editor. Always start from the audio file you exported when you finished recording.
TurboScribe will process the file in a couple of minutes for a thirty-minute recording. When it finishes, you will see the transcript laid out with sentence-level timestamps in the left margin. Each segment looks roughly like this:
[00:00:14] Welcome back to the channel.
[00:00:18] Today I want to talk about something I have been avoiding for six months.
[00:00:25] Let me show you what I built last week.
Here is the part where people lose their timestamps without realizing it: do not click "Export PDF." The PDF export strips the timestamps in some versions and reformats the text in others, and you will end up with a wall of unannotated paragraphs that is useless for the next step.
What you want is the in-browser "Show Timestamps" toggle. Click it on, select the entire transcript with cmd-A, copy it with cmd-C, and paste it into a plain text file or directly into Claude Code. The copy operation preserves the bracket-formatted timestamps cleanly. That format is exactly what the master prompt is expecting.
While we are talking about TurboScribe specifically, a quick word on the pricing math because it matters for the workflow's economics. The free tier gives you three transcriptions a day, each capped at thirty minutes. If you make one long-form video a week, the free tier holds up indefinitely. If you make a long-form video plus shorts and want to transcribe each one, you will probably hit the daily cap and need the paid plan. The Unlimited plan is twenty dollars a month billed monthly, or ten dollars a month if you commit annually. Ten dollars a month for unlimited timestamped transcripts is genuinely cheap given what the rest of this stack is doing.
If you are running on a tighter budget, you can substitute Whisper running locally — it produces the same timestamped format and is free — but the setup overhead is real and the TurboScribe web app is faster to use casually. I keep both available and reach for TurboScribe ninety percent of the time.
The Master Prompt: The Copy-Paste-Ready Template
This is the part of the workflow that took me the most iteration to get right, so I want to give you the exact prompt I now use as a copy-paste baseline. You will need to adapt the style word and the visual concept guidance to your own channel, but the structure is the part that matters.
Paste the following into Claude Code, then paste your TurboScribe transcript underneath it:
You have the Higgsfield image generation skill installed. I am going to paste a timestamped transcript of a video I recorded. For every timestamp marker in the transcript, generate ONE 16:9 image that visually represents the meaning of what was said at that moment.

Rules:
- 16:9 aspect ratio for every image
- Style: [STYLE WORD] — apply this style consistently across the entire batch
- Save every image to ./broll-output/
- Name each file using the timestamp from the transcript, in the format HH-MM-SS.png (use hyphens, not colons — colons break filenames on some operating systems)
- Generate sequentially, do not skip any timestamp
- If a moment is abstract (a transition word, a filler phrase), pick a visual metaphor — do not skip it

Confirm before you start by telling me how many images you are about to generate and an estimate of the Higgsfield credits it will consume. Wait for my go-ahead before generating.

Transcript follows below.
A few things to notice about this prompt and why they matter.
The colon substitution rule matters because macOS, Windows, and most cloud storage providers reject filenames with colons. If you let Claude Code save files as 00:01:34.png, you will get cryptic errors. Hyphens fix it.
The "confirm before you start" line matters because of credits. Higgsfield charges per generation, and a fifty-image batch is fifty separate billable events. You want a sanity check on the number before you spend the credits. Claude Code is good about respecting this hand-off — it will reply with something like "I am about to generate 47 images at roughly 5-8 credits each, total estimated cost 235-376 credits" and wait for you to type "go." That hand-off is the difference between a controlled burn and an accidental three-hour credit-melt.
The style word slot is where the workflow gets fun, and it is the next section.
If you would rather have someone build this entire pipeline as a reusable skill on your machine instead of figuring it out yourself, this is the kind of automation work I take on through my Fiverr projects — I will hand you the installed stack, a custom master prompt tuned to your channel's voice, and a one-line command to run the whole thing.
The Four Styles I Actually Use, and What Each One Is Good For
The style word in the master prompt is the single most powerful lever in the entire workflow. Change one word and the same transcript produces an entirely different visual identity for the video. I have settled into a rotation of four styles after testing dozens, and I want to be specific about which one I reach for in which situation.
Standard photo. This is the default. Photorealistic, clean lighting, modern but not gimmicky. I use it for tutorial-style videos where the visual job is to show the concept clearly without distracting from the audio. Tech walk-throughs, product reviews, anything where I want the b-roll to support the spoken content rather than compete with it. The Higgsfield skill defaults to a strong photoreal model for this style, and the output looks like editorial photography rather than the over-saturated stock-photo aesthetic that haunts most generic AI image generators.
Da Vinci sketch. This one I reach for when the video is about ideas — analysis, theory, anything that benefits from a "thinker's notebook" feel. The Da Vinci style produces aged-paper textures, anatomical line work, mechanical schematic vibes, the look of a Renaissance polymath's working journal. It does something interesting on YouTube specifically: it stops the scroll. In a feed full of glossy thumbnails and color-graded talking heads, a video with sepia-toned Renaissance sketches feels like an entirely different category of content. I have shipped two videos with this style and both outperformed my channel's average by a meaningful margin.
Watercolor cinematic. This is the one I save for storytelling videos. Personal essays, build logs, anything with a narrative arc rather than a tutorial structure. Watercolor softens the visuals without losing detail, the cinematic prefix tells the model to compose like a film still rather than a stock photo, and the combination produces b-roll that feels emotionally warm. I would not use this style for a deep-dive on Kubernetes networking. I would absolutely use it for a video about why I stopped charging hourly.
3D render. This is the futurist's choice. Octane-style 3D, soft volumetric lighting, materials with actual physical properties, the aesthetic of a high-end product reveal. I use this for anything about AI tools, infrastructure, or future-of-work content. It signals "this is a forward-looking video about the next thing" before the audio has even started.
Here is the magic trick the style system enables: once you have generated a full batch in one style, you can re-prompt Claude Code with a different style word and the entire batch regenerates. Same timestamps. Same filenames. Different visual identity. The transcript is the contract; the style is the layer on top. I have shipped two versions of the same video on two different platforms — one in standard photo for YouTube, one in Da Vinci sketch for a Substack-style outlet — using the exact same transcript and a one-word change in the prompt.
That is the part of the workflow that turns a single recording into multi-format content without re-doing any of the creative work.
CapCut Assembly: Where the Folder Becomes a Video
Once Claude Code finishes generating the batch, you will have a folder named broll-output/ (or whatever you named it in the master prompt) containing forty to one hundred PNG files named by timestamp. The filenames will look like:
00-00-14.png
00-00-31.png
00-01-02.png
00-01-47.png
...
Open CapCut on desktop. Create a new project. Drop your original audio file onto the timeline. Then drag the entire broll-output/ folder into the media panel.
This is the moment the timestamp trick pays off. CapCut imports the images and sorts them alphabetically by filename — which, because the filenames start with timestamps, is also chronological order. Select all of them. Drag the selection onto the video track above your audio. Each image lands in sequence, and a quick eyeball pass against the audio waveform tells you whether the timings are roughly aligned.
The remaining job is snap-to-audio. CapCut's "Snap" feature aligns clip edges to nearby waveform peaks and timeline markers. Turn snap on. Walk through the first few clips and adjust them slightly if they drifted by half a second. Once you confirm the snap is honoring the timestamps, the rest of the batch usually falls into place without intervention.
A few optional moves I add on top once the base alignment is done.
Overlay the original talking-head video on a sub-track with a forty-to-sixty percent opacity, so the viewer sees both you and the b-roll. This is the look that has come to define educational creator content in 2026, and CapCut does it cleanly with the Blend Mode dropdown on the upper track.
Drop a subtle paper-texture overlay across the whole video at low opacity to add a tactile feel that pure digital footage lacks. Most stock asset libraries include free paper textures. CapCut's own effects library has half a dozen.
Apply a single LUT (color grade) across the entire b-roll track to unify the look. Generated images sometimes drift in color temperature between shots, and one LUT applied to the whole stack washes those inconsistencies out.
The total assembly time for a thirty-minute video, once the b-roll batch is ready, is about ten minutes. Compare that to the three to five hours I used to spend hunting and placing stock footage manually. That is the number that matters.
The Cost and Time Math on a Real Thirty-Minute Video
Let me give you the actual numbers from the most recent video I shipped using this workflow, because the abstract pitch of "saves time and money" is meaningless without specifics.
The recording was a thirty-two-minute talking-head video on a tech tools roundup. TurboScribe processed the audio in two and a half minutes. The transcript came back with sixty-three timestamped segments — meaning sixty-three b-roll moments to generate.
I pasted the master prompt with standard photo as the style word. Claude Code confirmed it was about to generate sixty-three images and estimated 315 to 504 Higgsfield credits depending on which models the skill chose for each prompt. I typed "go." The full batch took about forty-five minutes to generate, mostly because Higgsfield rate-limits how many concurrent generations one account can run.
When the batch finished, the actual credit cost was 387 — well inside the estimate. On my Pro-tier Higgsfield plan, that batch was a small fraction of the monthly allotment. If I had been on the Starter plan at fifteen dollars a month, I would have used roughly a third of the monthly credits on this single video, which would still allow for two more videos before topping up.
CapCut assembly: eleven minutes including the snap pass, the talking-head overlay, the paper texture, and the LUT. Export: another four minutes for the render.
Total hands-on time from "audio file exported" to "video uploaded to YouTube": about thirty minutes of my time, plus roughly an hour of background processing time across TurboScribe and Higgsfield that I spent doing other things. The equivalent manual workflow was roughly five hours of focused screen time.
If you value your time at thirty dollars an hour, this workflow saves you about a hundred and twenty dollars of attention per video. The stack cost — TurboScribe annual at ten dollars a month plus Higgsfield Starter at fifteen — is twenty-five dollars a month all-in. You break even on the first video and everything after that is pure leverage.
I want to flag one nuance on these numbers. They assume you already know what you are doing with the master prompt and the editor. The first video you ship with this workflow will probably take you twice as long because you are still learning the prompt structure, the install quirks, and the CapCut assembly rhythm. By the third video, the times above are realistic. By the tenth, you will probably be faster than my numbers because you will have built your own style word library and your own master prompt variations.
What This Workflow Does Not Replace
I want to be honest about the limits because I have seen too many tutorials oversell automated pipelines as "the end of manual editing," which is not true and never has been.
This workflow does not replace talking-head footage. You still record yourself. The b-roll is the supporting visual layer above your audio, not a replacement for showing your face on camera. If your content strategy is faceless YouTube, this stack can probably handle the whole video — but for creator-led content, the talking head still anchors the viewer's attention and the AI b-roll is the texture above it.
This workflow does not replace product shots. If your video is reviewing a specific physical product, you need the actual product on camera. Higgsfield can generate beautiful product photography, but a viewer will know immediately whether the product on screen is the real one you tested or a generated version, and AI-generated product footage in a review context is the fastest way to lose viewer trust in 2026. Record real product B-roll separately and intersperse it.
This workflow does not handle motion shots that require continuity. If you need a clip of a person walking from left to right across the frame, then the same person turning and looking at the camera, generated b-roll will produce two unrelated images that do not feel connected. Higgsfield's Soul ID can help with character consistency, but for action sequences, real video footage is still the right answer.
And finally, this workflow does not replace taste. The model decides what to generate at each timestamp, but the model's taste is averaged across the entire internet. Your taste is specifically yours. The first batch will usually be eighty percent of the way there, and you will want to swap out the five or six images that the model misread or made boring. Twenty minutes of taste work after the auto-generation is finished is the difference between a video that feels like yours and a video that feels generic. Do not skip that pass.
The honest framing is that this stack collapses the mechanical, search-and-place portion of b-roll work from three hours to ten minutes, and gives you back those hours for the creative decisions that actually require your judgment. That is a great trade. It is not the same trade as "AI does everything now."
The Workflow Diagram in Your Head
Here is the whole pipeline compressed into the mental model I keep in my head when I am running it on a Wednesday morning.
Record audio. Upload to TurboScribe. Click "Show Timestamps." Select all, copy. Paste into Claude Code under the master prompt. Pick a style word. Confirm the credit estimate. Wait. Drop the folder into CapCut. Snap to audio. Overlay the talking head at fifty percent. Export.
That is the whole video. From the moment the recording stops to the moment the upload starts, you are looking at maybe two hours of clock time and thirty to forty-five minutes of hands-on attention. The rest is the machine working in the background while you go do something else.
The reason this matters is not the time savings in isolation. It is what the time savings unlock. I used to ship one long-form video every ten to fourteen days because the editing tax was the hard ceiling on my output. Now I am shipping two to three a week without burning out, because the part that used to take five hours takes thirty minutes. The frequency unlock is more valuable than any individual hour saved, because frequency is what compounds on YouTube and time-on-task does not.
If you are a creator who has been telling yourself for the past year that you would post more if editing did not eat your weekend, this is the workflow that resolves that excuse. Install it tonight. Ship a video on Saturday. Tell me on X how it went.
There is one final detail I want to leave you with, because it is the thing that surprised me most when I started using this stack at volume.
Every image Higgsfield generates gets saved permanently to your dashboard at higgsfield.ai. That means once you have built up a batch for a video, you have also built up an archive of on-brand visuals that you can re-use across thumbnails, shorts, blog post headers, and social media graphics indefinitely. The b-roll you generate today becomes the visual library you draw from forever. After three months of running this workflow, I had a dashboard with more than eight hundred generated images, every one tagged with the prompt that produced it, every one re-downloadable on demand. That archive is now its own asset — separate from the videos it was generated for, and arguably more valuable in the long run.
The timestamp trick is the unlock. The visual archive is the bonus. The thirty hours a month you get back is the point.
Claude Code Higgsfield Video Workflow: Quick Answers
How do I automate YouTube b-roll with Claude Code and Higgsfield?
Install the Higgsfield skill bundle into Claude Code with npx skills add higgsfield-ai/skills -a claude-code -g, transcribe your audio in TurboScribe with timestamps enabled, paste the transcript into a master prompt that asks Claude Code to generate one 16:9 image per timestamp, and drop the resulting folder into CapCut where the filenames sort to chronological order automatically. For the full master prompt template, see the section above titled The Master Prompt.
Why use TurboScribe instead of a script for the transcript step?
The transcript must come from your actual recorded audio, not your written script, because the timestamps need to map to spoken moments. A script-based transcript has no real timestamps — only word order. TurboScribe processes audio to text with sentence-level timestamps in two or three minutes for a thirty-minute file.
Does TurboScribe's free tier work for YouTube creators?
The free tier covers three transcriptions per day at thirty minutes each, which is enough for one long-form video plus a short or two daily. If you publish a long-form plus multiple shorts and want to transcribe each one separately, the Unlimited plan at ten dollars a month annual is the cheap upgrade.
Can I change the visual style of all the b-roll images at once?
Yes. Re-run the master prompt with a different style word — "Da Vinci sketch", "watercolor cinematic", "3D render", or any custom style description. The transcript stays the same, the timestamps stay the same, and Claude Code regenerates the entire batch in the new style. This lets you ship the same video with different visual identities for different platforms.
How much does the full Claude Code Higgsfield video workflow cost per month?
A creator-tier setup costs about twenty-five dollars a month all-in: Higgsfield Starter at fifteen dollars a month plus TurboScribe Unlimited at ten dollars a month annual. Claude Code requires an Anthropic subscription, which you likely already have for other work. A single thirty-minute video burns roughly three hundred to four hundred Higgsfield credits depending on the number of b-roll moments.
The One Habit That Makes This Stick
Everything above collapses into a single discipline: name every clip with its timestamp the moment it lands. Miss that step and the folder becomes a junk drawer; keep it and the assembly in CapCut turns into fifteen quiet minutes instead of a three-hour slog.
I've run this workflow across dozens of talking-head videos now, and the thirty-odd hours a month it hands back is the whole reason it earned a permanent slot in my stack. Start with one video. Box three hours. Watch how much of the dread evaporates when the b-roll is already waiting for you.
If you'd rather have the whole pipeline wired up for your channel, that's the kind of build I do through my studio work — but you have everything you need in this post to run it yourself first.